Sunday 8 June 2014

Made Up With Make Up Kit - Part Two Sarah Jessica-Parker


This is part two of my collaboration with Emma Smyth aka Terrible Tumbles. This time the look I am recreating is Sarah Jessica Parker's Met Ball look. Her dress was amazing and this make up, with a focus on the eyes, set off the look beautifully.


This is a great look for a night out. I've recreated the look but with a more wearable feel to it, so here we go...

1. Prep cleansed skin with a primer, this give you the perfect canvas for your base and helps your make up last. I used Laura Geller Champaigne Spackle (QVC).

2. Apply your foundation. Dot onto your face and then blend using a brush or sponge. Make sure you blend well into your neck and your hairline. I used Vichy Dermablend in Opal. This is a medium/full coverage foundation that has great coverage but feels light. I use this on my brides as it also lasts really well.


3. Apply concealer with a brush under your eyes and to any blemishes. Chose a shade one shade lighter for under your eyes and blend the edges with your fingers so that the colour melts into your skin. I used MAC Pro concealer palette in medium.


4. Set your base with a good coating of translucent powder using a large powder brush. I used Vichy Dermablend loose powder (Boots).

5. Fill your brows to give a more defined look. You can use powder or pencil, I used Benefit brow powder.

6. Apply a eye primer over your lids. This soaks up the natural oil on your eye lids and gives your eyeshadow a truer colour. I used MAC Painterly Pot in Painterly.

7. Apply a light silver/grey eyeshadow all over you old and up to your brow. I used Bare Minerals eyeshadow in Wearable Stone Light (QVC).


8. Next apply a mid silver/grey shade shade all over the lid and blend well into the crease line. Again a used a Bare Minerals shadow in Wearable Stone Medium (QVC).

9. Then apply a darker shadow with sparkle to the outside 3/4 of your eyelid. Blend well into the socket line and into the corner of your eye. I used Bare Minerals shadow in Rock Star (QVC).


10. Apply a line of black liner on across you upper lash line. I used Maybelline gel liner in black. Then smudge your lower lash line using a black kohl pencil. I used MAC kohl in Smoulder. You can also apply liner to your water line, I chose not to do this as it can make your eyes appear smaller. 

11. Apply two coats of black mascara. 


12. Contour your cheek bones using a matte bronzer. Suck in your cheeks and apply the bronzer to the hollow of your cheeks and blend well. I used MAC blush in Harmony.

13. Next apply a mid pink colour to your cheeks using a large brush. Smile and apply to the apples and blend it up to your hairline. I used MAC blush in Dare.


14. This look is finished with a simple nude lip. Line your lips with a nude pencil, such as No.7 liner in Nude.

15. Then apply two coats of a nude creamy lipstick, blotting in between. I used Clinique lipstick in Perfect Beige. 


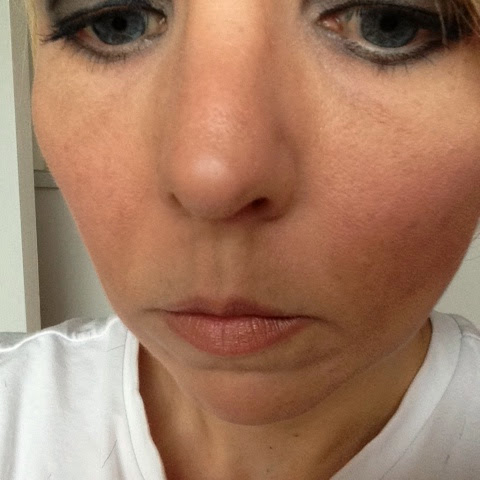
And that completes the look. You've got a wearable look for any night on town. Now over to you Emma.....


Sunday 11 May 2014

Made up with the Make Up Kit Part 1 - Lea Michelle


So myself and fellow blogger and pal Terrible Tumbles have decided to do a series called Made up with the Make Up Kit. The idea is that I recreate the look of a celebrity on myself as a professional make up artist and Emma (Terrible Tumbles) recreates the look herself. 

The first look we're going for is from Lea Michelle. The look keeps the eyes simple with all the emphasis on the fuscia lips.


So here's how I did it.....

1. Prep freshly cleanesed skin by applying a primer all over your face. I used Laura Geller tinted speckle  in Champaigne (available at QVC).


2. Apply foundation all over the face ensuring it's blended well into the neckline. I used Benefit Hello Flawless brightening make up in Champaigne. Cover any imperfections with concealer, it's important the base for this look is flawless. I used Benefit boi-ing concealer 01 under my eyes to cover dark circles and 02 on my cheeks to cover spot marks. I finished the base by applying Benefit Hello Flawless powder in Me vain, Champaigne.


3. Next I applied an eye primer to the eyelid. This helps eyeshadow stay in place and nutralises any colour on the eye lid. I used MAC Painterly paint pot. To define my brows I used Benefit Brows-ago-go. 
On the eye lid I applied a neutral beige shade all over the lid up to the brow bone. I used MAC eyeshadow in Shroom. To the lid I then applied gold eyeshadow and blended it into the crease line. I finished the eyes with a thin line of Maybelline lasting drama gel liner in black on the top lash line and two coats of LancĂ´me Hypnose volume mascara in black.


4. I contoured my cheekbones by applying a matt bronzer to the area underneath my cheek bones. The best way to do this it to suck your cheeks in, apply to the hollow and blend well so there sure no harsh lines. I used MAC blush in Harmony. To the apples of my cheeks I applied a mid pink blush and blended up my cheek bones and into the hair line. I used MAC blush in Margin. 


5. This look is all about the lips. Any fuscia/bright pink colour will work, this can be creamy, Matte or sheer. I have quite small lips which intense lip colour can quite often make look smaller. For this reason I chose Clinique chubby stick in 15 pudgy peony, a creamy moisturising sheer colour, and applied a couple of coats blotting between layers.

6. I finished the look by highlighting my cheekbones with MAC highlighter creame in Hush Frost.


This look is simple to achieve with make up you'll already have in your make up kit. It's a great universal look that will suit all colourings and look amazing on a big night out.

Now let's see how easy the look is to recreate, over to you Terrible Tumbles.....


Monday 24 March 2014

True Blue Baby I Love You...

I don't know where the time had gone since my last blog, so much for me saying "I'll post religiously every two weeks"! As with most things, life got in the way. I've now been inspired by my pal and fellow blogger, Terrible Tumbles, to get back on it!

So blue, and more precisely blue clothes and my obvious subconscious addiction to them. As a make up artist I avoid blue like the plague. In my opinion blue eye shadow has never, and never will look good on anyone (except my good pal Lauren who was born to rock a blue hair blue eyeliner combo). Yes it's a look I've worked, and tried in vain to try and work last seasons blue/aqua eyeliner look, but when I think back there was only one word and that was no!

So why my obsession with blue clothes then? Yes, blue is my favourite colour, but is that the reason I appear to fill my wardrobe with it? It was after last weeks post pay day Primark Shopping spree, when I got home and laid out the three tops I'd just bought for Glasto (you've got to buy early to get the good stuff!) that I realised they're are all light blue denim. Opening my wardrobe to hang my new purchases I realised that 80% of it involves blue, including every hue from the lightest to the darkest (my favourite look at the moment is double denim!)

(All tops from Primark)

So is my wardrobe predictable or do I just know what suits me? I'm not sure, but next time I buy anything I'm going to make sure it's not blue!

I also had to get the obligatory flowery headdress to complete the Glasto look. The sun was out last week I couldn't help it!